Garage Crevaison
While building the Villa Kleiboer for the TMC club layout, I also built my first self made 'kit' for my own module Etgaine: the Crevaison garage. (Crevaison means flat tyre in French ;-) ). It was actually meant as a test piece, to try out a building method from the excellent German book Perfekt bis ins Detail by Emmanuel Nouaillier. But the result was quite nice, so the test piece ended up on the module after all.
The Crevaison garage was also an experiment in another respect. Standard modules are only 50 cm deep. And according to the TMC requirements the main track needs to end exactly in the middle of both short ends of a module (or a series of modules). So that leaves only about 20 cm of space behind the track to built your scenery. Of which in my case a road and sidewalk still need to be deducted. Therefore I wanted to try out whether the use of mirrors could help suggesting more depth.
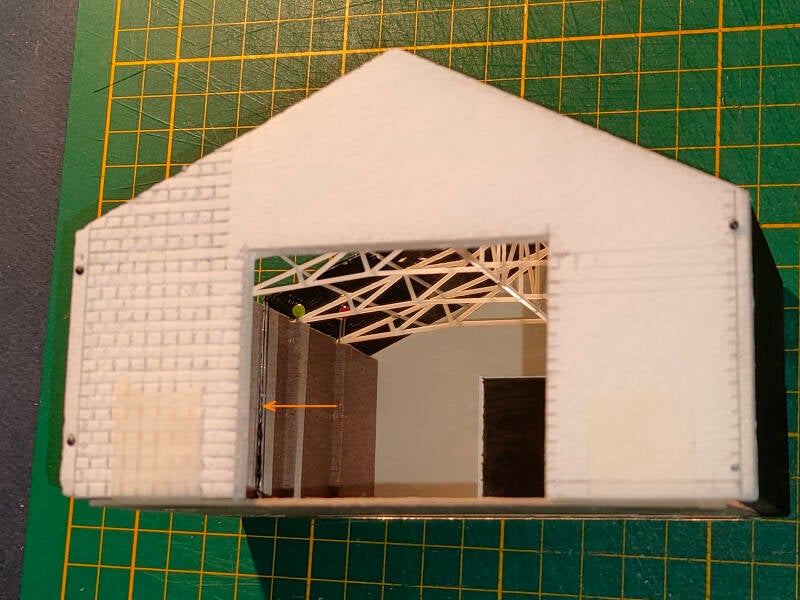
The model of the garage, with the location of the mirror indicated by the orange arrow. So the last two trusses you see in the roof are not real.
Inspiration
As is more often the case, this garage was inspired by a holiday snapshot of mine; in this case from an old shed annex parking in Leuven (B). The roof was completely rusted and through the glassless skylights all kinds of vines growed into the building. I wanted to try and catch that atmosphere in my model.

The original garage in Leuven.
Building method
The outer walls are once again made from 5mm thick Forex, the foamed pvc board. This material is quite soft and therefore easy to modify. The roof is from (of course home made) corrugated sheets; the trusses are glued from individual strips of polystyreen in various sizes, produced by Evergreen. The 'concrete' buttress over the entrance is a 3D print of my own. The font used here was especially chosen in a kind of Art deco style. The sliding doors last but not least are also made from very thin Evergreen strips, glued onto a piece of left-over plastic from a commercial kit.
I intend to discuss the methods I used in more detail under the tab Modeling techniques in the near future.

The traditional light bulbs have always been soldered between a plus and a minus truss. In this way you do not see any wiring.
Interior
Apart from the trusses, the side windows, the floor tiles at the entrance, the vines growing in and the parked cars also define the interior. So I added all of those in my model.
In the cars a small joke was added. The back side of the last, grey car has been painted black. Because viewers see this back side in the mirroring back wall, it looks like a black car has been parked behind the grey one. At the very back you can still see a small part of the reflection of the car in the front, the one that is covered with a sheet.
It is extremely difficult to make an nice photo of the interior of a small model because of the lack of light and depth of focus. But this picture gives an acceptable impression. The view is more or less the same as in the picture of the original garage at the very top.
The line in the wall on the left and in the floor give the location of the mirror away. In the 'hole' in the back wall you can also see the mobile phone with which the photo has been made.

The text Defense de fumer (Smoking forbidden) on the back wall is in fact written - in mirror writing - on the back of the concrete buttress above the entrance. One sees the text via the mirror on the back wall.
Lighting
A mirror back wall is of no use when you cannot look inside. So the sliding doors needed to be at least partially open. Therefore lights where needed inside the hall; without those it would be too dark. I used four small 15V mini light bulbs that I still lying around. (I would use LEDs though now).
To feed the light bulbs, extra trusses bent from metal wire were added in between the brown 'wooden' trusses. In the middle sits the +-truss, the minus is located at both the front and back end of the shed. The light bulbs were then soldered between both types of trusses. The two minus-trusses have been connected by a thin copper wire on top of the side wall on the right.
