DIY construction 4 (doors and windows)
Wall Openings
In the previous step, we applied a finish to the outer walls. Now, it’s time to cut out the openings.
After experimenting with different methods, I’ve found that cross-cutting from the back works best. Once the cuts are made, fold the flaps inward through the opening and glue them to the inside.
This technique leaves a small section of the stone print missing in each corner. However, you can easily touch up these areas by coloring the exposed cardboard with a pencil. Finally, apply glue around the window frame and press it into place from the backside.

Illustration showing the layered design approach for a monumental door.
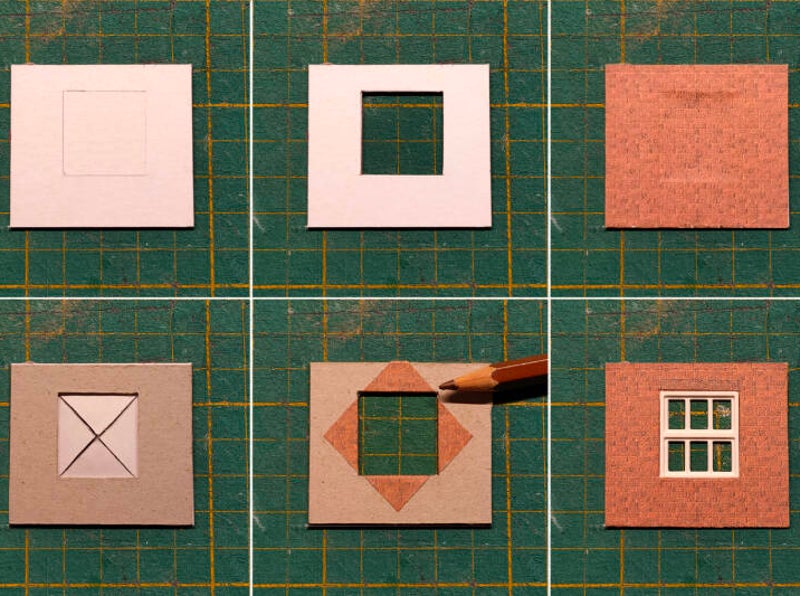
Creating a window in 6 steps: sketch the design, cut it out, attach the print, make cross cuts from the back, fold and secure the print, and finally place the window in position.
Crafting Your Own Doors and Windows
If pre-made doors and windows aren’t an option, why not create them yourself? I like using the 'layered approach' for the best results—check out the image on the left for inspiration.
The back layer is typically made of transparent plastic, designed to resemble glass. If desired, thin glazing bars can be added for extra detail. These can be crafted using small strips of paper, plastic, or even sewing thread. For more information, visit the page on Making glazing bars.
To make a door, start by making a door from painted cardboard or thin wood, and glue that onto the 'glass'. Once secured, fit a doorframe around it. For windows, simply glue the window frame directly onto the transparent plastic.
Once assembled, you can attach the completed door or window into the wall opening. If it complements the style of your building, consider adding decorative touches, such as additional ornamental frames or 'stonework' accents. Don’t forget to enhance the brickwork above windows and doors by including details like a row of vertically layered bricks.